Аdvertisement
IngredientsThe materials needed are:
Peanut butter cup candy molds
Betty Crockers Devil's Food Cake
1 can chocolate cream frosting
1 bag of Pink Candy Melts (you won't need
to use the entire bag, so a small bag works fine)
1 bag of White Candy Melts (optional)
1 bag of Brown Candy Melts
1 pack of edible Pen Markers (optional)
Sprinkles (optional)
Lollipop sticks (optional)
1 bag of original M&Ms
How to make Mini Chocolate Covered Cupcakes
I first saw these on Bakerella. These mini cupcakes were just SO adorable I couldn't resist making them! To be honest, I'm not an avid baker, because I don't really like to eat the final product; not because it's not tasty, but because I am not a sweets-lover. So when I decided to make these little treasures, I had to run out to my nearest crafts store and buy most of the materials; such as the molds, the chocolates, the sprinkles, and the edible writing pen. In the end, the results of these cute cupcakes were well worth the money spent on them. And even though I didn't eat more then two of them, I loved sharing them with others, who thoroughly enjoyed them (I think).
Luckily for me, I caught my boyfriend taking a bite out of one, so I yelled, "OMG come over!! I have to take a picture!" So this is how the inside looks like.
When you make these, I suggest taking your time and not rushing like me. A lesson I need to learn better is to never rush food. You should always take your time to make it, enjoy it, and it will turn out wonderful. If you rush through it, it will taste just like that. And that, my friends, would be a waste!
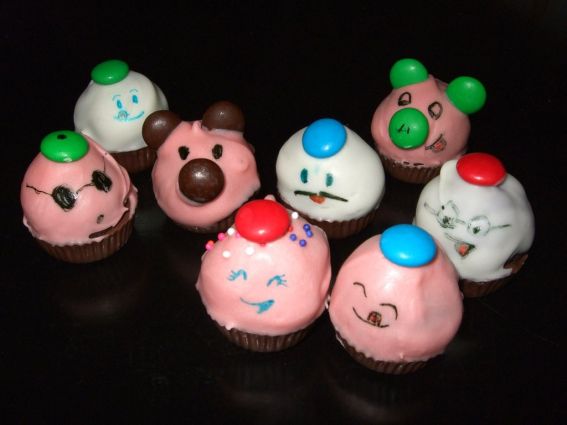
Anyway, these little things are essentially devils food cake (chocolate) covered with multicolored chocolate; a brown chocolate that makes up the cupcake base, and a different, more brilliant color that makes the cupcake tops. They're super cute! Aren't they?
You only really need one color of candy melts for the top of the cupcake, and this can be any color you want; it does not necessarily need to be white or pink. As for the lollipop sticks, Bakerella actually has a different way of making the cupcake so that you can stick the lollipop sticks into it easily. Her websitehas some beautiful pictures with wonderful step-by-step instructions on how to do this, if you're interested in this process. These have become such a hit that they were all over Martha Stewart's website at one point. I wasn't able to make them because the cupcakes above were more then enough work for me for one night.
Anyway, get ready, because here are some instructions! (I'll try to make them as detailed as I can, to make up for the lack of pictures.)
Cooking instructions:
Bake the cake mix as instructed on the box.
When the cake is complete, take out of oven and crumble thoroughly. I used two forks to help me do this.
Throw in the can of frosting and continue to crumble and combine the ingredients.
Use your hands and compress the cake into tiny balls. I used the molds to help me with the sizing of the cake balls. Of course, they should be small enough to fit into the mold, leaving only a tiny space between the mold and the cake (because, don't forget the chocolate that's supposed to fill in the mold later).
After you've completed your cake balls, cover them and place them in the fridge for a couple hours to let it harden. (**Or, if you're in a hurry, you can place them, covered, inside your freezer for 15 minutes).
Once you have decided that your cake balls have hardened, melt the brown chocolates according to the directions on the back of the bag. (I used a microwave, and boy did it work well! But be sure not to over-do it and burn the chocolate, like I did on my first try. Boo me!)
Now that your chocolate is melted, fill the molds with brown chocolate (a little more then half way per mold) and place cake balls snugly inside the mold. This should cause the chocolate to rise up and cover at least half of your cake ball, which is what you want!
Place cake ball with mold, inside the fridge again for at least an hour. (**Or, to speed up the process you can place it in the freezer for 10 minutes).
Melt the pink chocolate chips. Pop the cake balls out of the mold and dip the top half into the other colored chocolate. (Try to dip it in deep enough so that the pink color engulfs the entire top half of the cake ball, while also slightly touching the brown chocolate cup).
Add sprinkles and an M&M on top.
Set inside the fridge to harden. (**If you want to draw faces on them, wait until you take them out of the fridge to do so.)
Author j6tran
opensourcefood.com/people/j6tran/recipes/mini-chocolate-covered-cupcakes


